线程是程序开发中必须使用到的概念,但是也是相当难掌握的概念。因为在单线程的程序中,所有的逻辑都是线性发生的,出现问题定位的时候只需要一步一步调试就可以了。但是在多线程的环境中,各种莫名其妙的情况都会出现。
我这里记录下自己在开发过程中总结出来的一些线程的基本逻辑和碰到过的坑。
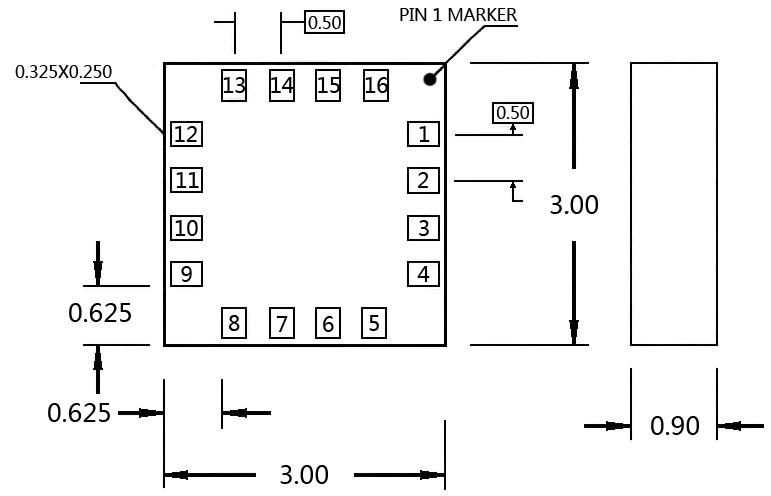
我的环境信息如下:
线程的基本使用
最基础的使用方法
这里话不多说,直接上基本的demo代码:
void t1()
{
    int cnt = 1;
    printf("thread start\n", cnt);

    return;
}

int main()
{
    for(int i=0; i<20; i++){
        thread * th1 = new thread(t1);

        th1->join();
    }

    return 1;
}
上面就是通过一个thread的指针,new了一个thread类,这个类接受一个函数指针作为线程的运行对象。这样就初始化了并运行了一个线程。
这个输出结果就是:
thread start
thread start
thread start
thread start
thread start
...
重点说一下的是join函数(后面还会提到)。我刚接触到这个函数的时候也有点不理解,为啥叫join,是加入一个什么东西。
后来才想到,实际上就是告诉操作系统的线程调用模块,这个线程加入到线程调用的队列中去,也就是进入线程调度系统去排队,详细的demo后面有介绍。
按照上面的代码,就是创建一个线程,就把这个线程排上队。那么这20个线程就是一个一个的来执行。
上面的代码是无法看出来是不是顺序执行的,那么我们改一点点东西,标记一下函数的执行顺序。
在创建线程时传参
void t1(int i)
{
    printf("thread start, thread number is %d\n", i);

    return;
}

int main()
{
    for(int i=0; i<20; i++){
        thread * th1 = new thread(t1, i);

        th1->join();
    }

    return 1;
}
这样输出就会变成:
thread start, thread number is 0
thread start, thread number is 1
thread start, thread number is 2
thread start, thread number is 3
thread start, thread number is 4
thread start, thread number is 5
...
这样就达到了上面的效果,看到了所有的线程,在join函数的作用下,一个一个排队执行。大家可以试着去掉join函数,那样,这个顺序就是乱的了,随机的,看操作系统的心情了。
但是,这里有一个小坑,使用mac系统的坑。mac系统中的g++使用的编译器是clang,而在mac中的clang默认不支持c++11的多线程,必须在编译时指定参数:
g++ muti_thread.cpp -std=c++11
否则会编译不通过(我这里全是手动编译,如果是工程化的话,需要配置到编译器配置中去)。
另外,在线程的传参中:
- 如果是基本类型的的参数,默认时以值传递的方式进行。也就是两个变量之间没什么关系,子线程中是自己的资源,如果做引用传递,编译器会报错。
- 如果参数是指针,指针本身是值传递,但是会出现指向同一地址的问题。
- 如果参数是类,逻辑上也是值传递。
- 多个参数的传递就是依次往后就行:
  void t1(int i, int j)

  thread * th1 = new thread(t1, i, j);
另外,线程和调用函数不是一个概念,不要通过线程的函数去返回什么值,那个做不到的。
再看看join
join在很多地方叫做联结。我理解除了排队这个联结就是说新建的这个线程和创建他的这个线程有没有关系,如果调用了join函数,那么主线程(或者说创建线程的线程)就会等待子线程(被创建的线程)结束后再执行,如果没有,那么主线程创建子线程后就会自己继续执行。
我们在上面的代码里再修改一下看看,在join后增加了一个输出:
void t1(int i)
{
    printf("thread start, thread number is %d\n", i);

    return;
}

int main()
{
    for(int i=0; i<20; i++){
        thread * th1 = new thread(t1, i);

        th1->join();
        std::cout << "continue" << std::endl;
    }

    return 1;
}
输出结果就变成了:
thread start, thread number is 0
continue
thread start, thread number is 1
continue
thread start, thread number is 2
continue
thread start, thread number is 3
continue
thread start, thread number is 4
continue
thread start, thread number is 5
continue
如果没有join这个函数的话:
int main()
{
    for(int i=0; i<20; i++){
        thread * th1 = new thread(t1, i);

        std::cout << "continue" << std::endl;
    }

    return 1;
}
输出就是比较随机的(就看操作系统怎么调度了,而且这个0-1-2-3-4-5的顺序也不一定能保证):
continue
thread start, thread number is 0
continue
thread start, thread number is 1
continue
thread start, thread number is 2
thread start, thread number is 3
continue
continue
thread start, thread number is 4
continue
thread start, thread number is 5
continue
相对应的,还有一个解除链接的函数:detach,解除主线程与子线程之间的这个等待关系。
因为上面提到的join的逻辑,只要在主线程里调用了join函数,主线程相当于就别挂起了,所以直接join后调用detach是没用的:
int main()
{
    for(int i=0; i<20; i++){
        thread * th1 = new thread(t1, i);

        th1->join();
        std::cout << "continue" << std::endl;
        th1->detach();
    }

    return 1;
}
这样会出现段错误,因为在主线程执行到detach函数的时候,实际上子线程已经退出了。
实际上,我理解线程被new出来之后,本身与主线程之间就是独立的,只有调用了join之后,detach才会有意义,不要被阻塞的太长了。
线程与线程之间的同步
上面的内容是比较基础的,如果每个线程都是处理相对独立的任务,互不相关,那么还是比较简单的。但很多情况下是多线程会访问到同样的内容,这样,多线程的同步就是至关重要的问题了,没有协调好的话,就是会出现很多意想不到的情况。
设置这样一个场景:
有一个统一的变量,在上面的20个线程中,每个线程都给这个变量进行赋值,赋值为自己的线程编号,然后输出,在输出的过程中会处理一点别的事情,这是需要花一点时间的,所以我们用一个sleep语句来模拟这个线程所费的时间,demo如下:
void t1(int i)
{
    // m.lock();
    cnt = i;

    int a = rand();
    // 休眠随机的时间
    std::this_thread::sleep_for(std::chrono::milliseconds(a%100));
    // m.unlock();
    printf("thread start, thread number is %d, count is: %d\n", i, cnt);

    return;
}

int main()
{
    for(int i=0; i<20; i++){
        thread * th1 = new thread(t1, i);

        std::this_thread::sleep_for(std::chrono::milliseconds(10));
    }

    std::cout<<"main quit, count is: " << cnt << endl;

    return 1;
}
输出却是,很明显是乱的:
thread start, thread number is 0, count is: 0
thread start, thread number is 1, count is: 5
thread start, thread number is 4, count is: 6
thread start, thread number is 2, count is: 7
thread start, thread number is 3, count is: 8
thread start, thread number is 6, count is: 9
thread start, thread number is 9, count is: 9
thread start, thread number is 8, count is: 10
thread start, thread number is 5, count is: 11
thread start, thread number is 10, count is: 13
thread start, thread number is 7, count is: 13
thread start, thread number is 15, count is: 15
thread start, thread number is 13, count is: 16
thread start, thread number is 11, count is: 16
thread start, thread number is 16, count is: 18
thread start, thread number is 17, count is: 19
thread start, thread number is 12, count is: 19
main quit, count is: 19
这里发现整个乱的,因为每个线程都是独立运行的,很有可能在你的线程里去做别的事情的时候,被另外的线程把这个值改掉了。
还有就是发现输出都没有19个,这是因为主线程已经结束了,所以后面的线程都没等到输出就已经整个进程退出了。
根据上面讲到的内容,很容易想到,加上join就可以了,确实,加上join后的输出就是:
thread start, thread number is 0, count is: 0
thread start, thread number is 1, count is: 1
thread start, thread number is 2, count is: 2
thread start, thread number is 3, count is: 3
thread start, thread number is 4, count is: 4
thread start, thread number is 5, count is: 5
thread start, thread number is 6, count is: 6
thread start, thread number is 7, count is: 7
thread start, thread number is 8, count is: 8
thread start, thread number is 9, count is: 9
thread start, thread number is 10, count is: 10
thread start, thread number is 11, count is: 11
thread start, thread number is 12, count is: 12
thread start, thread number is 13, count is: 13
thread start, thread number is 14, count is: 14
thread start, thread number is 15, count is: 15
thread start, thread number is 16, count is: 16
thread start, thread number is 17, count is: 17
thread start, thread number is 18, count is: 18
thread start, thread number is 19, count is: 19
main quit, count is: 19
但是这里最关键的问题在于,每次主线程都要等待前一个线程结束之后再继续执行,也就是等待前一个线程结束之后再启动下一个线程,这就是一个串行的程序,就失去了多线程的意义了。
那么在这种情况下就只能使用线程同步的一个关键概念了:锁。
在std库中,就有一个基本的锁对象:mutex
使用
include <metux>就可以使用
demo代码:
int cnt = 0;
mutex m;

void t1(int i)
{
    m.lock();
    cnt = i;

    int a = rand();
    std::this_thread::sleep_for(std::chrono::milliseconds(a%100));
    m.unlock();
    printf("thread start, thread number is %d, count is: %d\n", i, cnt);

    return;
}

int main()
{
    for(int i=0; i<20; i++){
        thread * th1 = new thread(t1, i);

        std::this_thread::sleep_for(std::chrono::milliseconds(10));

    }

    getchar();
    std::cout<<"main quit, count is: " << cnt << endl;

    return 1;
}
-
m.lock和m.unlock中间的代码可以理解为原子执行(实际上不是)
-
这个锁实际上理解为一把钥匙更好,就是说一个线程通过m.lock去获得这个关键区代码的运行权限(钥匙),如果钥匙在别人手里,lock函数就会阻塞这个线程直到获得这把钥匙。
-
m.unlock函数就是用完钥匙了,把钥匙还给管理员(操作系统),管理员就可以把这把钥匙给别人了。
-
在使用和别人共享的资源的时候,最好是增加一把锁。(当然也未必,因为锁是需要等待,会降低程序的性能),比如下面的程序就可以不使用锁:
void t1(int i) { // m.lock(); cnt = i; int a = rand(); std::this_thread::sleep_for(std::chrono::milliseconds(a%100)); // m.unlock(); printf("thread start, thread number is %d, count is: %d\n", i, cnt); return; } int main() { for(int i=0; i<20; i++){ thread * th1 = new thread(t1, i); std::this_thread::sleep_for(std::chrono::milliseconds(200)); } getchar(); std::cout<<"main quit, count is: " << cnt << endl; return 1; }因为在这个程序里,每个线程的处理时间不会超过100毫秒,下一个线程创建的时间都在200毫秒了,肯定不会出现别的线程来捣乱的情况,所以不需要使用锁。
这个例子不一定非常准确,只是想说明,在c++程序里,性能为第一要务,如果从业务和逻辑上分析,没有必要加锁,就不要去加锁。加锁不好的话反而会发生死锁这样的麻烦事。
这一篇先说这么多,后面还想从操作系统的角度来说一说更底层的线程原理,还有就是结合内存使用一起,说说线程安全和可重入的问题。